Friday, September 4, 2015

Magic is in the air as Redcat Racing prepares to bring forth a brother to the Terremoto 1/8th scale " T8"

Redcat Racing has announced that they will be releasing a new line of RC's that they are referring to as Team Redcat racing . 

They have stated that the first vehicle in the new lineup will be the   TR-MT8E Monster truck .


So what is it and where did it come from ? The OEM for this Truck is Team Magic and its model name is E6III HX .  www.teammagic.com


If you don't know who Team Magic is that's understandable they are best known for their onroad cars and don't have a huge following compared to many manufactures in the United States . The good news is that the E6 Series of trucks has been in production for a good while and the Trooper version seemed to develop a  decent following due to its durability . 

One rub that may develop is a lack of speed as noted by Aussie RC Playground while testing the E6III HX . Previous brushless E6 models that I have seen had 6s capable ESC's where the E6III HX has  a 4s capable ESC . 


All in all the truck should be a good platform and I hope they announce the MSRP and spec sheet soon so we can see how the cost stacks up compared to the other 1/8th scale trucks on the market from Traxxas,HPI,Thundertiger,Team Losi , Team Associated ,Arrma , and ETC.


Sunday, August 16, 2015

Looks like Redcat Is getting ready to rerelease the Terremoto line

Redcat Racing released the 1/8th scale Terremoto  back in late 2013 / early 2014 and was hit with a lawsuit from Traxxas right before the release of the 1/10th scale version Dubbed  T-10 . 

It seems the hold the on the trucks has been lifted and Redcat is looking to have The Version 2.0 models out and available before Christmas . 

So what did they change ? well from these Picks lifted from the Redcat Racing sight and a little paint action hopefully you will be able to tell . 


Now color me confused but the manuals are showing a bell crank set up shown below .

So who knows how everything will end up but I'm still excited and hope to see if the T-10 is worth the wait . 


Wednesday, August 5, 2015

My list of recommended upgrades and modification for the Redcat Racing Ground Pounder ( part 3)

Lets see  for the third installment I'm gonna bounce around a bit .

Number 1:
Well the next thing on my recommend things to do is to lower the battery / electronics tray as low as it can go . and rotate 180 degrees. I pretty much took the chassis down to 2 bare plates took several measurements made sure my holes where going to be square and drilled away . I left about 3 mm worth of clearance between the spur and plate . Please note that moving the tray will lower the center of gravity a lot the only negative is that the motor will be lowered as well and the up travel of the suspension will be lowered .  I rotated the tray to move the battery to the front , it also corrects the motor rotation as the factory setup has the motor rotating opposite of its intended design .
Red is the factory holes Green is the holes I drilled and am currently using .


Number 2:
Body post are high on my list as the stock ones are pretty breakable . I have installed post by CRP they use slightly bigger screws so drilling will be required but they are about as beefy as you can get .


Number 3:

I think my next suggestion is to install a external BEC such as   Hobbyking YEP 20A HV (2~12S) SBEC w/Selectable Voltage Output  .  The speed control / most speed controls do not supply enough power for the stock servo to operate at its peak performance . In this case the stock ESC's BEC is rated at 2 amps and 5.0 volts the external BEC will provide 6.0 volts and will increase the servo speed by ruffly 24% . The increase number of available amps will help stabilize the voltage and increase torque . This will be even more evident when using 4 wheel steering .


Number 4:
I suppose my next recommendation would be to upgrade the rear driveshaft as under load the yokes can deform and separate leaving you will a front wheel drive monster truck . Redcat Racing has one available and the price is pretty reasonable but due to slop in the assembly and the soft aluminum used I do not recommend it in high powered applications or if lots of gritty mud is expected as I feel they will wear out fast . I find my self looking at steel driveshafts meant for crawler applications as a good replacement . under the right conditions the front driveshaft may need upgraded but so far I have not needed to upgrade .  

Wednesday, July 29, 2015

My list of recommended upgrades and modification for the Redcat Racing Ground Pounder ( part 2)

To continue on my recommended upgrade and modification list .

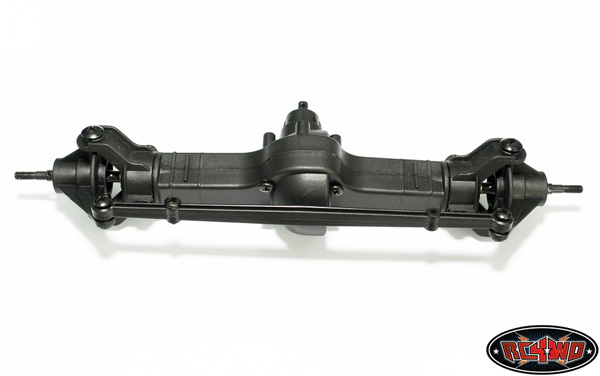
I figure the next area I want to focus on is the front and rear axles .

All over the internet you can read about people who have broke axle housings on the Ground Pounder but to be honest I feel most of the breakages could easily be avoided by making a few modifications .

Modification number 1:
Drill out all the screw holes in the axle halves so that 3 mm  screws will pass through with little to no resistance . Next install longer 3 mm screws that will allow a small diameter washer and a nut to be installed .

Reason's

The holes in the axles are small and require the screws to be threaded through both halves of the assembly .
Drilling out the holes speeds up assembly.
I also feel this clamps the axle halves better and increases the rigidity of the assembly and makes the halves act  more as one unit  .


Modification number 2:
Shimming the differential and ring and pinion is the next modification I would recommend . Shimming the ring and pinion gears is about give and take . I recommend adding shims to the side bearing of the differential till there is no side to side play . I then move shims from left to right and right to left till the pinion and ring gear mesh with just a tiny bit of play . Adding shims behind the pinion can move the pinion inward increase the contact area and the strength of the ring and pinion .  So moving the pinion inward is a good thing . The main cause of compromise in shimming is binding when the steering knuckles are turned as the dog bones are a couple millimeters 2 long for perfect differential placement  , at least in my experiences .  As a finishing touch I also shimmed the pinion on the outside so it can not move inward by putting a brass bushing between the bearing and the drive shaft yoke . I sanded the bushing to make it the right thickness .


Modification number 3:
Clean the Grease out of the differential  and fill them with silicon oil . Currently I'm  using 5000 wt hot bodies diff oil in the  rear and 3000 wt HB oil in the front . "I'm considering going to thicker diff fluid in the future"   Even using the 3000 wt and the 5000wt  oils I can say stability and drive ability have increased greatly due to the reduction in tire ballooning when weight shifts off a tire and for mud and snow it will keep you chugging forward with authority  .


Thursday, July 23, 2015

My list of recommended upgrades and modification for the Redcat Racing Ground Pounder ( part 1)

In the time I have owned a Redcat Racing Ground Pounder I've broke a few things my list and my step fathers can be found here .  Link                 

The first thing you should look in to upgrading on the Ground Pounder is the motor : 

Really I find the top speed pretty good but I feel the truck needs more torque for driving in grass and driving off road . 

My  recommendation  is a 550 motor with 19-22 turns here are a few examples :

Redcat Racing Part # 28446  sells for about $16.99


Traxxas Titan  (21T) Part # 3975 sells for about $21.49 


Thunder Tiger  part # PD9221 sells for about $27.99


My second upgrade I recommend is to upgrade pinion and spur gear . 


Part # bs801-014 is a 43 tooth mod 1 spur gear made from a composite plastic that can replace the stock spur .
About $10.00


Part # MPO-017 is a steel version of the BS801-014
About  $14.00


Now you will need at least 1 pinion that has a Module 1 tooth profile . If you are using a motor with a 1/8th inch shaft " like the ones listed above " here are a few options.


Pinion Gear, 9T/12T x 3mm, Mod 1 part # ECX232028 

about $13.00 for a pair 


OFNA 3mm Bore Mod 1 Pinion Gear  about $12.00 each  

11 tooth = Part # 21316
12 tooth = Part # 21314
13 tooth = Part # 21315
14 tooth  = Part # 21306
15 tooth = Part # 21311
16 tooth = Part # 21312


Wednesday, July 15, 2015

Why a 1/16 scale Traxxas transmission maybe good for your crawler .

So here is my reasoning .

 The 1/16 Traxxas transmission is a very small unit and is very compact .

 It has pretty much proven its self to be a strong and durable transmission as its quite common for people to buy a Traxxas 1/16th scale Revo or Summit and install 1/10th scale truck wheels and rubber and then install 540 or 550 brushless systems intended for 1/10th scale car's and trucks .

So what pushed me over the top and made it my must have transmission ? The gear ratio flexibility . The transmission is designed as a double gear reduction where the center gear(s) are not a idler like most transmissions in RC but acts as a jackshaft . Traxxas designed the transmission so that its ratio could be changed by swapping 2 gears shown in picture below circled in green .


The reason for this was because they have and are using  this transmission in several chassis configurations that use different size tires . So whats the transmissions ratios well you can choose 1.93 or 3.71 . OK so that doesn't tell you much . Here is a couple of examples showing the gearing extremes of this transmission vs a Axial AX10 transmission and the old Traxxas 272 magnum. the axle ratio listed is for a AX10 or HPI king axle and the motor is a generic kv rating for a 35 turn 3 pole 540 motor .    


Axial AX10 2.60 Traxxas 272 magnum Traxxas 1/16 3.71 ratio  Traxxas 1/16 1.93 ratio 
Low

Differential Ratio: 2.92
Transmission Ratio: 2.6
Other Ratio: 1
Spur Tooth Count: 96
Pinion Tooth Count: 12
Total Voltage: 8.40
Motor KV: 1565
Tire Diameter (inches): 5.
Top Speed (MPH): 3.22
Low 

Differential Ratio: 2.92
Transmission Ratio: 2.72
Other Ratio: 1
Spur Tooth Count: 90
Pinion Tooth Count: 12
Total Voltage: 8.40
Motor KV: 1565
Tire Diameter (inches): 5.
Top Speed (MPH): 3.27
Low

Differential Ratio: 2.92
Transmission Ratio: 3.71
Other Ratio: 1
Spur Tooth Count: 55
Pinion Tooth Count: 18
Total Voltage: 8.40
Motor KV: 1565
Tire Diameter (inches): 5.
Top Speed (MPH): 5.9
low

Differential Ratio: 2.92
Transmission Ratio: 1.96
Other Ratio: 1
Spur Tooth Count: 55
Pinion Tooth Count: 18
Total Voltage: 8.40
Motor KV: 1565
Tire Diameter (inches): 5.
Top Speed (MPH): 11.17
High

Differential Ratio: 2.92
Transmission Ratio: 2.6
Other Ratio: 1
Spur Tooth Count: 72
Pinion Tooth Count: 30
Total Voltage: 8.40
Motor KV: 1565
Tire Diameter (inches): 5.
Top Speed (MPH): 10.72
High 

Differential Ratio: 2.92
Transmission Ratio: 2.72
Other Ratio: 1
Spur Tooth Count: 76
Pinion Tooth Count: 31
Total Voltage: 8.40
Motor KV: 1565
Tire Diameter (inches): 5.
Top Speed (MPH): 10.01
High

Differential Ratio: 2.92
Transmission Ratio: 3.71
Other Ratio: 1
Spur Tooth Count: 45
Pinion Tooth Count: 31
Total Voltage: 8.40
Motor KV: 1565
Tire Diameter (inches): 5.
Top Speed (MPH): 12.42
High

Differential Ratio: 2.92
Transmission Ratio: 1.96
Other Ratio: 1
Spur Tooth Count: 45
Pinion Tooth Count: 31
Total Voltage: 8.40
Motor KV: 1565
Tire Diameter (inches): 5.
Top Speed (MPH): 23.51


Now you probably wont use the 1.93 ratio in a crawler but the flexibility would be nice to have (could throw some touring car tires on and go cruising around the local carpet track at a brisk pace )

So whats the down side ?

 I think the main reason this hasn't found more use in crawlers and other projects comes down to the output shaft size . Its small with a diameter of  4 mm  its smaller than the shafts most drive shafts attach to . Most drive shafts used in crawling have a hole designed for a 5 mm  or 6 mm shaft .   Now the final drive gear that attaches and drives this shaft has a 5mm hole and the shaft its self is 5 mm in the center and is machined down to 4 mm at its ends . The shaft has been circled in the diagram above . By replacing the bearings with 8x5 bearings and replacing the shaft with one that is 5 mm from end to end common drive shafts should be able to be used . I am currently looking for a shaft that will be a drop in replacement but one should be able to be made fairly easily . 


Friday, July 10, 2015

Parts list monster /crawler / mega truck . ( subject to change as the build goes on .)

Parts list so far

HPI 1/10 Crawler King Battery Box, Waterproof Receiver Box & Servo Mount

Crawler Battery Tray$0.99
Ordered: 1$0.99

HPI 1/10 Crawler King Front & Rear Axle Hub Carriers & 8 Bearings

Crawler Axle Carriers$6.49
Ordered: 1$6.49

HPI 1/10 Crawler King Complete Front or Rear Differential & Bearings

Crawler Differential$10.99
Ordered: 2$21.98

HPI 1/12 Wheely King Front & Rear Drive Shafts & Axles

Wheely Drive Shafts$11.99
Ordered: 1$11.99

Traxxas 1/16 Mini Slash Transmission & Spur Gear

mSlash Transmission$13.99
Ordered: 1$13.99


HPI 10 Bullet MT / ST Flux Front & Rear Assembled Shocks & Springs with Oil

eBullet Shocks$8.49
Ordered: 1$8.49

Traxxas 1/10 Telluride 4x4 Drive Shafts, Wheel Hubs & Nuts

Telluride D/S$18.99
Ordered: 1$18.99

Traxxas 1/10 T-Maxx 2.5 Turnbuckles, Servo Saver & Bell Crank

Classic Turnbuckles$5.49


Ordered: 2$10.98


So I got it in my head to build a low cost monster /crawler .

Deciding I wanted to build some thing with solid axles was the easy part . I'm a cheap person and to to be honest I wanted this project to be as cheap as possible . Mostly because I wanted this to be a trail truck / crawler and I had the feeling that it wouldn't take long for it to turn in to a smallish monster truck or something similar to a mega truck .


I'm gonna have a post dedicated to the parts that I am using for this project and a link will and can be found here . Parts list   after it gets posted . The parts I'm starting with  where purchased from https://www.dollarhobbyz.com and more sources will be added in time as there will be lots of little bits I'm sure I haven't even thought about and I'll probably be adding pieces I will be making my self .

The stars of the low budget show .

A pair of HPI Crawler king / Wheely king axles .

 At $40.45  through Dollar Hobbyz Plus shipping and handling and a little assembly these were the cheapest axles I could find . Given that Most of the Axial based axles seem to be selling for $40.00 per axle These seemed to be the best way to go .


How about a Traxxas 1/16th scale transmission with the 540 motor mount .

At $13.99 for this transmission from Dollar Hobbyz Its a steal and I think it may be a very over looked but great crawler transmission with just a bit of work . My reasoning may take a bit of explaining so expect a link here LINK to a post just talking about this transmission and the reasons why i plan to use it .


Monday, June 29, 2015

( 2 year plus update) Turnigy 4000mAh 2S 30C hardcase pack


Original post ( May 17, 2013 )
Well in the time I have owned 2 of these packs " a little over 2 years"  I have repeatedly compared it to the ZIPPY Flightmax 4000mAh 2S1P 25C Car Lipoly which is one of the cheapest hard-case packs on the market . To be fair they have both aged about the same. Both originally had usable capacities of around 4000 Mah and both are running around 2200 Mah these days when ran in my ZD Racing ZMT 10 and in less demanding applications "crawler and slower vintage cars and trucks " I see usable capacities around 3500 Mah. I will say these packs seem to require being balanced more often than the 4000 Mah zippy packs .  I also had a physical failure   recently . It seems the positive lead broke the tab that is used to attach it to the cell and so the pack is dead as I'm not going to even attempt fixing it . I do think this could have been prevented if I had forced some silicone sealant into the case around the wires to give them additional support .   But in short I feel I got lots of good use and bang for my buck with these packs and if you can't run the 4000 Mah Zippy packs due to your chassis design I feel Turnigy should be the next pack to check out . 

Sunday, June 28, 2015

(2 year plus update) ZIPPY Flightmax 4000mAh 2S1P 25C Car Lipoly (ROAR APPROVED)

Original post ( June 15, 2013 )
After 2 years I'm happy to say. I have had a great experience with these batteries and for the money they have been a great battery . 

Originally I purchased 2 of these and they have both been comparable and aged equally in terms of usable capacity and punch . 

Usable capacity has dropped off as time has gone on and they are both down to about 2200 Mah worth of usable capacity when ran in my ZD Racing zmt 10 compared to ruffly 4000 Mah usable capacity when they where new . The primary difference is the voltage sag during use . Basically the LVC of the speed controller will get tripped much earlier due to the dip in voltage . Without a load the battery will read around 6.84 volts but with a load applied a 6.2 volt LVC will trip. So these batteries are now being used primarily in slower and less amp hungry applications  where they still preform quite well and when matched with the right application " crawlers and low powered vintage stuff "can still provide about 3500 Mah . The packs still maintain there balance well no matter the rate they are discharged at and still do not require balance charging often .

So if your chassis design will allow you to use these packs I consider these my top pick for low cost and effective Lipo's.


Sunday, June 21, 2015

Been a while .

Well I haven't posted anything for along time but that's about to change .